Sprache ändern: Change to German
Changer la langue: Change to French
Apply for a U.S. Visa
in Switzerland
Travel Coordinator
On this page:- Overview
- Instructions to Access the Travel Coordinator Profile and Manage Multiple Appointments
- More Information
Overview
If you are a travel coordinator repeatedly booking appointments for other travelers, you can create a travel coordinator profile in our online system. Instead of creating a new profile for each applicant, this feature allows you to manage and track all your clients under your profile. From this central location you can schedule, reschedule, cancel or confirm multiple client appointments from one screen. This eliminates the need for multiple profile names, passwords and external tracking of your client appointments. This feature is not intended to replace either the group appointment or other programs listed under “Local Visa Programs”
If you want to make a bulk payment for multiple applicants traveling together, click here.
A few things to remember:
- If an applicant is applying for an expedited or emergency appointment do not schedule through the travel coordinator profile. The applicant must schedule an interview through the regular process as an individual.
- If you are scheduling multiple applicants during one session, the group will have the same interview date. If the applicants aren't travelling together they must be scheduled on a different scheduling session so they have a separate interview date.
- Group request aren't available for TCs. Group requests should be made from the regular profiles. See the group appointment instructions for further details.
Instructions to Access the Travel Coordinator Profile and Manage Multiple Appointments
Step 1
Log in and create a profile in our online applicant system. If you already have a profile, skip to step 2.
Step 2
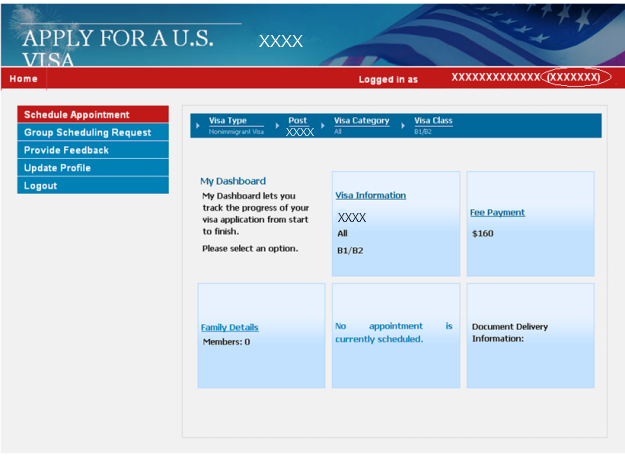
Send an email to travel-coordinator@ustraveldocs.com with your UID number in the subject line. This will grant you access to schedule applicants as a travel coordinator. Your UID number can be found on the right-hand side of the screen next to your user name. You do not need to put any text in the body of this email.
Below is a screenshot showing where to find your UID after logging into your profile:
Step 3
Wait 5 minutes for your email to be processed and then click on the Home link in the upper left hand corner. You will see that your dashboard and menu items have changed. The left-side menu will include Search Appointments and Appointment History options.

Step 4
If you are ready to schedule an appointment, click on Schedule Appointment. You will complete the information for visa type, post, visa category, visa class, and applicant information. The system will then prompt you to pick a specific date for your client's visa interview and provide confirmation details.
Step 5
You can continue to add other clients to your profile and schedule more appointments. If you need to view your previously scheduled appointments, you can click on the Search Appointments or view Appointment History.
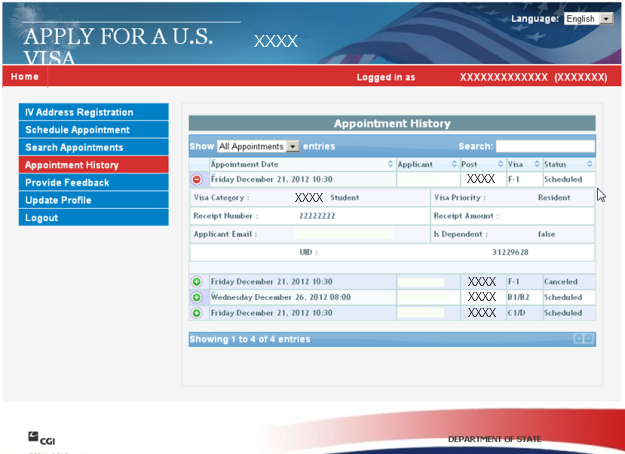
Appointment History allows you to view all your appointments. If you click on the green plus sign you can see a quick snapshot of your client's information such as appointment date, visa category, applicant email and UID. You can also organize your client list by appointment date, visa type, or status.
Note: Please note that the Appointment History option has limitations in terms of the maximum number of appointment records stored in the system. Therefore the information in it should not be used as a point of reference to your own database records.
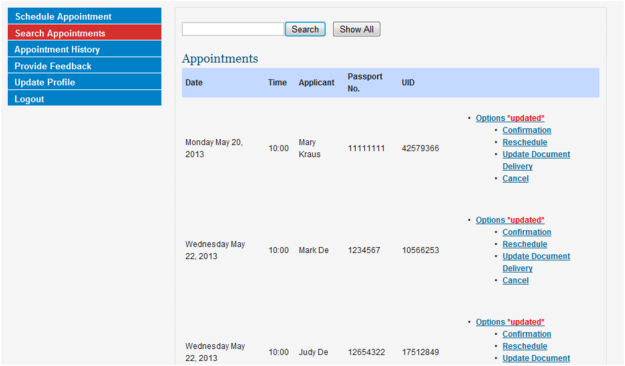
Search Appointments allows you to perform an action for your client. As seen in the screenshot below, you can access the confirmation letter, reschedule, update document delivery information or cancel the interview of your client.
More Information
NOTE: If you change your individual access to a travel coordinator profile you cannot schedule an appointment for yourself. To schedule your own appointment, send another email to travel-coordinator@ustraveldocs.com with your UID number in the subject line. This will disable your travel coordinator profile. When you schedule your appointment you will need to remove all previously scheduled appointments on the Dependents screen. After you've scheduled your appointment, send the email again and your access will be reinstated.